Creating an OTP Screen in Flutter
Nowadays, one time password (OTP) is used a lot as an authentication mechanism. Sometimes the OTP is sent using SMS and sometimes its sent through email. A screen for users to input the OTP has to be created.
In this article we will talk about creating a simple screen in flutter to allow users to enter the OTP.
Suggested readings
Although the OTP screen can be designed using a simple EditableText or TextField and with the keyboard available with mobile, we will create a fancier screen to do this. The screen will not use the EditText/TextField or the keyboard. This is how its going to look.
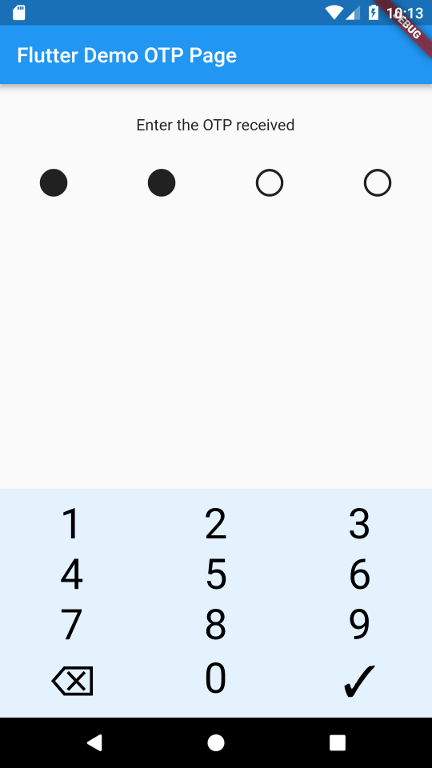
Layout wise, the design has two parts - an OTP area and the keypad. All the UI elements are within a Column widget.
At the top we have a text widget aligned centre. Below it we have a Row widget with four Text widgets with a unicode character “○” (U+25CB) to display a blank circle and once a digit is entered from the keypad we replace the character at that position with unicode character “●” (U+25CF).
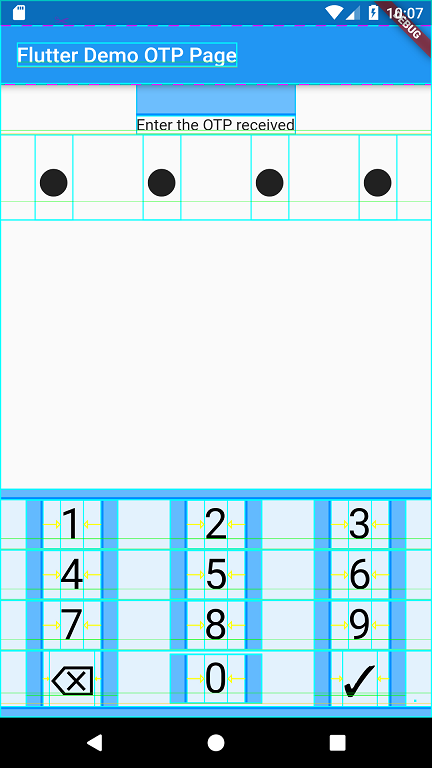
The keypad consists of 4 Rows enclosed in a Column widget. Each Row consists of 3 FlatButtons.
The image below shows the layout.
The screen uses the keypad to take input from the user. We use two variables - first one to take OTP input and the second one to show symbols. We initialise _otp as blank text and _otpSymbols as a slice of 4 unicode characters of a blank circle.
 ....
 ....
 String _otp = ""; //will hold the entered OTP
 var _otpSymbols = ["\u{25CB}","\u{25CB}","\u{25CB}","\u{25CB}"]; //holds symbols to display
 ....
 ....
When the user taps on the keys on the keypad:
- We append the digit to the
_otpif the lenght of_otpis less than 4. - If the user taps on the backspace, we remove the last character from the
_otpstring. - If the user taps on the check mark, we validate and show the entered otp in the snackbar.
Here is the relevant portion of the code for the keypad:
....
....
....
  Row(
      mainAxisAlignment: MainAxisAlignment.spaceAround,
      children: <Widget>[
        FlatButton(
          onPressed: () {
            _handleKeypadClick('1');
          },
          child: Text('1',
              style: TextStyle(
                  fontSize: 40,
                  color: Colors.black,
                  fontWeight: FontWeight.w400)),
        ),
        FlatButton(
          onPressed: () {
            _handleKeypadClick('2');
          },
          child: Text('2',
              style: TextStyle(
                  fontSize: 40,
                  color: Colors.black,
                  fontWeight: FontWeight.w400)),
        ),
        FlatButton(
          onPressed: () {
            _handleKeypadClick('3');
          },
          child: Text('3',
              style: TextStyle(
                  fontSize: 40,
                  color: Colors.black,
                  fontWeight: FontWeight.w400)),
        )
      ]),

....
....
....
    Row(
        mainAxisAlignment: MainAxisAlignment.spaceAround,
        children: <Widget>[
          FlatButton(
            onPressed: () {
              _handleKeypadDel();
            },
            child: Text('\u{232b}',
                style: TextStyle(
                    fontSize: 40,
                    color: Colors.black,
                    fontWeight: FontWeight.w400)),
          ),
          FlatButton(
            onPressed: () {
              _handleKeypadClick('0');
            },
            child: Text('0',
                style: TextStyle(
                    fontSize: 40,
                    color: Colors.black,
                    fontWeight: FontWeight.w400)),
          ),
          FlatButton(
            onPressed: () {
              _handleSubmit();
            },
            child: Text('\u{2713}',
                style: TextStyle(
                    fontSize: 40,
                    color: Colors.black,
                    fontWeight: FontWeight.w400)),
          )
        ]),
  ),
....
....
....
And here is the function that handles the taps on the digits. The function does two things:
- Appends the digit to the
_otpvariable - Replaces the ○ with ● for the number of digits entered for the otp.
  void _handleKeypadClick(String val) {
    setState(() {
      if (_otp.length < 4){
      _otp = _otp + val;
      for (int i=0; i < _otp.length; i++)
        _otpSymbols[i] = "\u{25CF}";
      }
    });
  }
This function handles the tap to the backspace - it simply removes the last digit from the _otp and replaces the last ● with ○.
  void _handleKeypadDel() {
    setState(() {
      if (_otp.length > 0) {
        _otp = _otp.substring(0,_otp.length - 1);
        for (int i = _otp.length; i < 4; i++)
          _otpSymbols[i] = "\u{25CB}";
      }
    });
  }
And finally, the function that fires on tapping the check button. It simply validates the _otp variable and displays a message in the snackbar.
  void _handleSubmit() {
    if (_otp.length == 4)
    _scaffoldKey.currentState.showSnackBar(SnackBar(
      content: Text('Entered OTP is $_otp'),
    ));
    else
      _scaffoldKey.currentState.showSnackBar(SnackBar(
        content: Text('OTP has to be of 4 digits'),
          backgroundColor: Colors.red,
      ));
  }
This is a very simple implementation, I am sure we could have been more clever with the code but it does gets the job done. Hope it is of help to someone.
The entire source code is available at github.