How to authenticate and login users in Flutter from a REST Api
Introduction
In this article we will discuss how to use a REST api backend to authenticate users from a Flutter app. We will build a very basic nodejs REST api backend. If you already have a backend then you can use that also. And then we will be building a basic Flutter app to connect to this backend and login to the app. It is assumed that the reader has a basic understanding of nodejs, rest api principles and flutter.
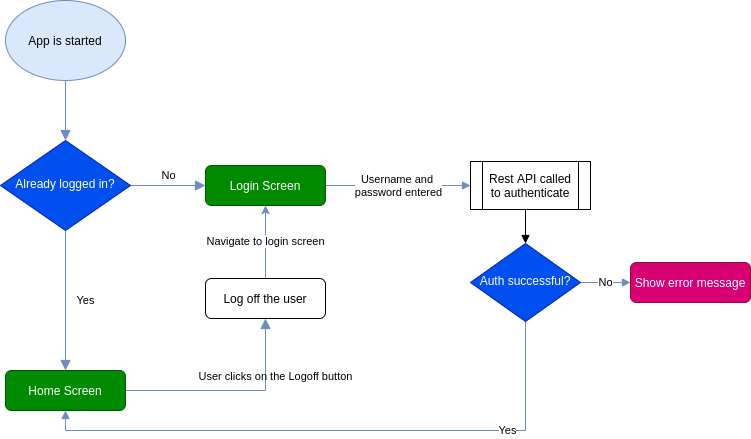
Overview of the app
The flowchart below shows the flow of this app.
And here is a short clip of the app in action.
Building the REST api backend
We will be using nodejs to build this backend. Lets begin.
We create a new folder, name it as flutter-backend.
user@localhost:~/projects$ cd flutter-backend
user@localhost:~/projects/flutter-backend$ npm init
Accept all prompts of npm. We will be using express framework to build this. We will install two dependencies, express and body-parser.
user@localhost:~/projects/flutter-backend$ npm i express body-parser
Once these are installed, we write our api. Here is the code.
const express = require('express');
const bodyParser = require('body-parser');

var app = express();

app.use(bodyParser.urlencoded({
    extended: true
}));
app.use(bodyParser.json());

app.use(function(req, res, next) {
    res.header("Content-Type", 'application/json');
    res.header("Access-Control-Allow-Origin", "*");
    next();
});

app.post('/user/login', function(req, res) {

    var username = req.body.username,
        password = req.body.password;

    if (!username || !password) {
        return res
            .status(400)
            .jsonp({
                error: "Needs a json body with { username: <username>, password: <password>}"
            });
    }

    if (username !== password) {
        return res
            .status(401)
            .jsonp({
                error: "Authentication failied.",
            });
    }

    return res
        .status(200)
        .jsonp({
            'userId': '1908789',
            'username': username,
            'name': 'Peter Clarke',
            'lastLogin': "23 March 2020 03:34 PM",
            'email': 'x7uytx@mundanecode.com'
        });
});


app.get('/user/:id', function(req, res) {

    var userId = req.params.id;

    if (!userId) {
        return res
            .status(400)
            .jsonp({
                error: "Needs a json body with { username: <username>, password: <password>}",
            });
    }

    return res
        .status(200)
        .jsonp({
            'userId': '1908789',
            'username': 'pclarketx',
            'name': 'Peter Clarke',
            'lastLogin': "23 March 2020 03:34 PM",
            'email': 'x7uytx@mundanecode.com'
        });
});


// catch 404 and forward to error handler
app.use(function(req, res, next) {
    /*var err = new Error('Not Found');
    err.status = 404;
    next(err);*/
    return res.status(404).json({
        success: false,
        message: "not found"
    });
});

if (app.get('env') === 'development') {
    app.use(function(err, req, res, next) {
        console.log(err);
        return res.status(err.status || 500).jsonp({
            success: false,
            "data": [{
                message: err.message
            }]
        });
    });
}


var port = process.env.PORT || 9001;

const server = app.listen(port, function() {
    console.log('Server up at http://localhost:' + port);
});

process.on('SIGTERM', () => {
    console.info('SIGTERM signal received.');
    console.log('Closing http server.');
    server.close(() => {
        console.log('Http server closed.');
    });
});

process.on('SIGINT', () => {
    console.info('SIGINT signal received.');
    console.log('Closing http server.');
    server.close(() => {
        console.log('Http server closed.');
    });
});
Save it as index.js and to run this, do node index.js at the terminal.
user@localhost:~/projects/flutter-backend$ node index.js
Server up at http://localhost:9001
We are exposing two endpoints:
POST \user\login
GET \user\:userId
\user\login is a POST endpoint accepting a json input of username and password of the following format:
{
    username:
    password:
}
As this is just a demonstration api, we are simply checking if the username and password are same and if they are we are returning a mock user object in json format. If the username and password are not same, we respond back with a Authentication failed message.
\user\:userId returns the user data of the userId passed in the parameter. For demonstration purpose, we simply return a mocked user json object.
Building the Flutter app
This app will consist of only two screens, the login screen and the home screen. But before we dive into the screens lets discuss how we can consume the api from flutter.
Interfacing with the REST api
Now that we have our REST api, lets see how we can connect to it from our Flutter app. We will write our api interaction code in the api.dart file inside the service package. We will he using the http library to connect to the api. Our api has only two methods - one for authenticating and another for getting user details. Lets write some code to call these.
Authentication
For authentication we will be doing POST \user\login passing the username and password as JSON in the following format.
{
    username:
    password:
}
Here is the flutter method for it:
String _baseUrl = "http://192.168.1.8:9001/";
Future<ApiResponse> authenticateUser(String username, String password) async {
  ApiResponse _apiResponse = new ApiResponse();

  try {
    final response = await http.post('${_baseUrl}user/login', body: {
      'username': username,
      'password': password,
    });

    switch (response.statusCode) {
      case 200:
        _apiResponse.Data = User.fromJson(json.decode(response.body));
        break;
      case 401:
        _apiResponse.ApiError = ApiError.fromJson(json.decode(response.body));
        break;
      default:
        _apiResponse.ApiError = ApiError.fromJson(json.decode(response.body));
        break;
    }
  } on SocketException {
    _apiResponse.ApiError = ApiError(error: "Server error. Please retry");
  }
  return _apiResponse;
}
If you are trying this in your own machine then your
baseUrlmight be different. Check your ip address and change thebaseUrlaccordingly.
Notice that this is an async function. This is because fetching data over the internet may take an unkown amount of time and we do not want our UI to be blocked during that. This function returns a Future. Specifically, it returns a Future of type ApiResponse.
A future (lower case “f”) is an instance of the Future (capitalized “F”) class. A future represents the result of an asynchronous operation, and can have two states: uncompleted or completed.
A Future<T> instance produces a value of type T.If a future doesn’t produce a usable value, then the future’s type is Future<void>.A future can be in one of two states: uncompleted or completed.When you call a function that returns a future, the function queues up work to be done and returns an uncompleted future.When a future’s operation finishes, the future completes with a value or with an error.
The http.post method calls the REST api POST endpoint /user/login and passes the following json body.
{
  username:
  password:
}
The api will respond back with a response code of 200 when the auth is successful and a json will be sent back:
{
  'userId': '1908789',
  'username': username,
  'name': 'Peter Clarke',
  'lastLogin': "23 March 2020 03:34 PM",
  'email': 'x7uytx@mundanecode.com'
}
ApiResponse class encapsulates the response from the api. Here is how the class looks:
class ApiResponse {
  // _data will hold any response converted into
  // its own object. For example user.
  Object _data;
  // _apiError will hold the error object
  Object _apiError;

  Object get Data => _data;
  set Data(Object data) => _data = data;

  Object get ApiError => _apiError as Object;
  set ApiError(Object error) => _apiError = error;
}
Here is how the ApiError looks like. Its a bit of overkill, we could have done it by simply using a string field in the ApiResponse.
class ApiError {
  String _error;

  ApiError({String error}) {
    this._error = error;
  }

  String get error => _error;
  set error(String error) => _error = error;

  ApiError.fromJson(Map<String, dynamic> json) {
    _error = json['error'];
  }

  Map<String, dynamic> toJson() {
    final Map<String, dynamic> data = new Map<String, dynamic>();
    data['error'] = this._error;
    return data;
  }
}
This is how we are using this class in our authenticateUser method:
. . . .
  case 200:
        _apiResponse.Data = User.fromJson(json.decode(response.body));
        break;
  case 401:
        _apiResponse.ApiError = ApiError.fromJson(json.decode(response.body));
        break;
. . . .
When we get a 200 from our REST api, we instantiate the User class and assign it to the ApiResponse.Data. And if we get an error, we instantiate the ApiError class and assign it to the ApiResponse.ApiError. We take the error message that we receive from the api and assign it to ApiError.error.
Let’s now take a look at the User class, this class is built based on the response that we are getting from our REST api.
class User {
  /*
  This class encapsulates the json response from the api
  {
      'userId': '1908789',
      'username': username,
      'name': 'Peter Clarke',
      'lastLogin': "23 March 2020 03:34 PM",
      'email': 'x7uytx@mundanecode.com'
  }
  */
  String _userId;
  String _username;
  String _name;
  String _lastLogin;
  String _email;

  // constructorUser(
      {String userId,
        String username,
        String name,
        String lastLogin,
        String email}) {
    this._userId = userId;
    this._username = username;
    this._name = name;
    this._lastLogin = lastLogin;
    this._email = email;
  }

  // Properties
  String get userId => _userId;
  set userId(String userId) => _userId = userId;
  String get username => _username;
  set username(String username) => _username = username;
  String get name => _name;
  set name(String name) => _name = name;
  String get lastLogin => _lastLogin;
  set lastLogin(String lastLogin) => _lastLogin = lastLogin;
  String get email => _email;
  set email(String email) => _email = email;

  // create the user object from json input
  User.fromJson(Map<String, dynamic> json) {
    _userId = json['userId'];
    _username = json['username'];
    _name = json['name'];
    _lastLogin = json['lastLogin'];
    _email = json['email'];
  }

  // exports to json
  Map<String, dynamic> toJson() {
    final Map<String, dynamic> data = new Map<String, dynamic>();
    data['userId'] = this._userId;
    data['username'] = this._username;
    data['name'] = this._name;
    data['lastLogin'] = this._lastLogin;
    data['email'] = this._email;
    return data;
  }
}
We have also enclosed our code in a try catch block to catch any exceptions like uncreachable server or other errors and populate the ApiError class.
Getting user details from the api
Our REST api also has a GET method to get details of a specific user. The endpoint is \user\:userId. We will write a flutter method to call this. This method will take the userId as a parameter. Unlike the authentication method, instead of doing a POST we will be doing a GET here.
Future<ApiResponse> getUserDetails(String userId) async {
  ApiResponse _apiResponse = new ApiResponse();
  try {
    final response = await http.get('${_baseUrl}user/$userId');

    switch (response.statusCode) {
      case 200:
        _apiResponse.Data = User.fromJson(json.decode(response.body));
        break;
      case 401:
        print((_apiResponse.ApiError as ApiError).error);
        _apiResponse.ApiError = ApiError.fromJson(json.decode(response.body));
        break;
      default:
        print((_apiResponse.ApiError as ApiError).error);
        _apiResponse.ApiError = ApiError.fromJson(json.decode(response.body));
        break;
    }
  } on SocketException {
    _apiResponse.ApiError = ApiError(error: "Server error. Please retry");
  }
  return _apiResponse;
}
Building the UI
Login screen
Our login screen will have two fields to enter the username and password along with a button. Here is the snippet of the code that builds the UI.
. . . . . .
. . . . . .
Widget build(BuildContext context) {
    return Scaffold(
        key: _scaffoldKey,
        appBar: AppBar(
          title: Text('Login'),
        ),
        body: SafeArea(
          top: false,
          bottom: false,
          child: Form(
            autovalicreated: true,
            key: _formKey,
            child: SingleChildScrollView(
              padding: const EdgeInsets.symmetric(horizontal: 16.0),
              child: Column(
                  crossAxisAlignment: CrossAxisAlignment.start,
                  mainAxisAlignment: MainAxisAlignment.spaceBetween,
                  children: <Widget>[
                    Column(
                      crossAxisAlignment: CrossAxisAlignment.start,
                      children: <Widget>[
                        TextFormField(
                          key: Key("_username"),
                          decoration: InputDecoration(labelText: "Username"),
                          keyboardType: TextInputType.text,
                          onSaved: (String value) {
                            _username = value;
                          },
                          validator: (value) {
                            if (value.isEmpty) {
                              return 'Username is required';
                            }
                            return null;
                          },
                        ),
                        TextFormField(
                          decoration: InputDecoration(labelText: "Password"),
                          obscureText: true,
                          onSaved: (String value) {
                            _password = value;
                          },
                          validator: (value) {
                            if (value.isEmpty) {
                              return 'Password is required';
                            }
                            return null;
                          },
                        ),
                        const SizedBox(height: 10.0),
                        ButtonBar(
                          children: <Widget>[
                            RaisedButton.icon(
                                onPressed: _handleSubmitted,
                                icon: Icon(Icons.arrow_forward),
                                label: Text('Sign in')),
                          ],
                        ),
                      ],
                    ),
                  ]),
            ),
          ),
        ));
  }
. . . . . .
. . . . . .
The code is not so complicated. Uses two TextFormFields and a RaisedButton in a ButtonBar inside a Form. On pressing the button we will validate the inputs and also call the REST api for authentication. This logic will be written in the _handleSubmitted method.
Here is the _handleSubmitted method:
void _handleSubmitted() async {
    final FormState form = _formKey.currentState;
    if (!form.validate()) {
      showInSnackBar('Please fix the errors in red before submitting.');
    } else {
      form.save();
      _apiResponse = await authenticateUser(_username, _password);
      if ((_apiResponse.ApiError as ApiError) == null) {
        _saveAndRedirectToHome();
      } else {
        showInSnackBar((_apiResponse.ApiError as ApiError).error);
      }
    }
  }
This method validates the form, in case of any validation errors we show them in the snackbar. If the user has entered both the username and password, we proceed to call the authenticateUser method. Notice that the authenticateUser method is called with an await. We do this because the authenticateUser method is an async method.
To use authenticateUser method we have to import the following packages:
import 'package:flutterloginrestapi/models/user.dart';
import 'package:flutterloginrestapi/models/api_error.dart';
import 'package:flutterloginrestapi/models/api_response.dart';
import 'package:flutterloginrestapi/service/api.dart';
{{< /highlight >}}

The `authenticateUser` returns an object of type `ApiResponse`. We check if the `ApiResponse.ApiError` has any errors, if it has we show the error else we redirect the user to the home screen. The redirection happens in the `_saveAndRedirectToHome()` method.

{{< highlight dart >}}
  void _saveAndRedirectToHome() async {
    SharedPreferences prefs = await SharedPreferences.getInstance();
    await prefs.setString("userId", (_apiResponse.Data as User).userId);
    Navigator.pushNamedAndRemoveUntil(
        context, '/home', ModalRoute.withName('/home'),
        arguments: (_apiResponse.Data as User));
  }
Once the user is successfully authenticated we load up the home screen and we do not want that the user should be able to come back to the login screen. To achieve this we use the Navigator.pushNamedAndRemoveUntil method. The documentation says:
Push the route with the given name onto the navigator that most tightly encloses the given context, and then remove all the previous routes until the predicate returns true.
We are saving the userId of the user in the SharedPreferences. We are also passing the ApiResponse object as an argument.
Home Screen
We show the user’s name, last login date time and the email address. We do this by extracting the User object from the navigator’s argument.
The logout button simple removes the userId that we had saved in the login screen from the SharedPreferences.
import 'package:flutter/material.dart';
import 'package:flutter/rendering.dart';
import 'package:flutterloginrestapi/models/user.dart';
import 'package:shared_preferences/shared_preferences.dart';
class MyHomePage extends StatefulWidget {
MyHomePage({Key key, this.title}) : super(key: key);
final String title;
_MyHomePageState createState() => _MyHomePageState();
}
class _MyHomePageState extends State<MyHomePage> {
void _handleLogout() async {
SharedPreferences prefs = await SharedPreferences.getInstance();
prefs.remove('userId');
Navigator.pushNamedAndRemoveUntil(
context, '/login', ModalRoute.withName('/login'));
}
Widget build(BuildContext context) {
final User args = ModalRoute.of(context).settings.arguments;
return Scaffold(
appBar: AppBar(
title: Text("Home"),
),
body: Center(
child: Column(
mainAxisAlignment: MainAxisAlignment.center,
crossAxisAlignment: CrossAxisAlignment.center,
children: <Widget>[
Text("Welcome back " + args.name + "!"),
Text("Last login was on " + args.lastLogin),
Text("Your Email is " + args.email),
RaisedButton(
onPressed: _handleLogout,
child: Text("Logout"),
)
],
),
));
}
}
Wrapping up
We have now seen both the login screen and the home screen. We will now look at the rest of the code of the app and how these screens are called. The file structure of the app is:
|
+---+models
|   +--api_error.dart
|   +--api_response.dart
|   +--user.dart
|
+---screens
|   +--home.dart
|   +--login.dart
|
+---service
|   +--api.dart
|
+--landing.dart
+--main.dart
The main.dart file is the starting point of this app. We have the main() method in this file.
import 'package:flutter/material.dart';
import 'package:flutterloginrestapi/screens/home.dart';
import 'package:flutterloginrestapi/screens/login.dart';
import 'landing.dart';
void main() => runApp(MyApp());
class MyApp extends StatelessWidget {
Widget build(BuildContext context) {
return MaterialApp(
title: 'Login Demo',
routes: {
'/': (context) => Landing(),
'/login': (context) => Login(),
'/home': (context) => MyHomePage(title: 'Login Demo'),
},
theme: ThemeData(
primarySwatch: Colors.deepOrange,
),
);
}
}
We are creating a MaterialApp widget, giving it a title, giving it a theme and also setting up the routes. The routes we are setting up are:
'/'- This route is the default route when the app is opened and will take the execution to theLanding()file./login- This route is for our login screen./home- This is for our home screen.
The Landing class in landing.dart file checks if the user has already logged in and if finds this to be true, loads the home screen else loads the login screen.
We will check if the user is logged in by checking the SharedPreferences in the initState() method. We will write a separate method _loadUserInfo(), we will call this from initState().
If we find userId in the SharedPreferences then we call the getUserDetails() method to fetch the details from our rest api. We then show the home screen.
In case userId is not found, we show the login screen.
. . . . .
. . . . .
void initState() {
super.initState();
_loadUserInfo();
}
_loadUserInfo() async {
SharedPreferences prefs = await SharedPreferences.getInstance();
_userId = (prefs.getString('userId') ?? "");
if (_userId == "") {
Navigator.pushNamedAndRemoveUntil(
context, '/login', ModalRoute.withName('/login'));
} else {
ApiResponse _apiResponse = await getUserDetails(_userId);
if ((_apiResponse.ApiError as ApiError) == null) {
Navigator.pushNamedAndRemoveUntil(
context, '/home', ModalRoute.withName('/home'),
arguments: (_apiResponse.Data as User));
} else {
Navigator.pushNamedAndRemoveUntil(
context, '/login', ModalRoute.withName('/login'));
}
}
}
. . . . .
. . . . .
Below is the complete code for the landing.dart file. The only UI element is the CircularProgressIndicator(). It will be displayed utill initState() execution is completed. It indicates to the users that a background process is running and the app is not stuck.
import 'package:flutter/material.dart';
import 'package:flutterloginrestapi/models/api_response.dart';
import 'package:flutterloginrestapi/service/api.dart';
import 'package:shared_preferences/shared_preferences.dart';
import 'models/api_error.dart';
import 'models/user.dart';
class Landing extends StatefulWidget {
_LandingState createState() => _LandingState();
}
class _LandingState extends State<Landing> {
String _userId = "";
void initState() {
super.initState();
_loadUserInfo();
}
_loadUserInfo() async {
SharedPreferences prefs = await SharedPreferences.getInstance();
_userId = (prefs.getString('userId') ?? "");
if (_userId == "") {
Navigator.pushNamedAndRemoveUntil(
context, '/login', ModalRoute.withName('/login'));
} else {
ApiResponse _apiResponse = await getUserDetails(_userId);
if ((_apiResponse.ApiError as ApiError) == null) {
Navigator.pushNamedAndRemoveUntil(
context, '/home', ModalRoute.withName('/home'),
arguments: (_apiResponse.Data as User));
} else {
Navigator.pushNamedAndRemoveUntil(
context, '/login', ModalRoute.withName('/login'));
}
}
}
Widget build(BuildContext context) {
return Scaffold(body: Center(child: CircularProgressIndicator()));
}
}
Hope this is of help. Please mail us in case of any questions.